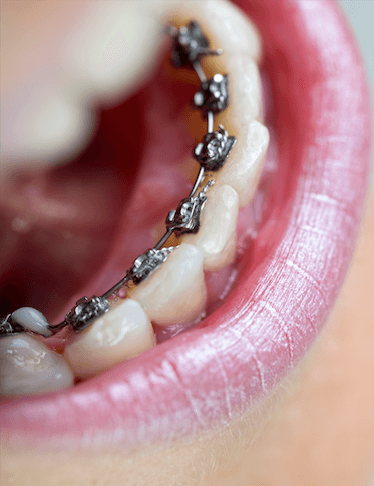
5 Ways to Get Comfortable with Your New Braces  

There is no way around it, it’s going to be a bit uncomfortable and somewhat painful when you first get your braces. While the entire experience will eventually get better, the first few days or even weeks are going to be filled with discomfort, soreness, tenderness, and pain. Luckily, there are some things you can do to make things more comfortable for you while wearing braces.

Tip #1 – Keep Yourself Hydrated

Keep yourself hydrated, it’s that simple. Staying hydrated will make wearing braces more comfortable. The coolness of the water can reduce any inflammation from the brackets or wires. Water will work as a temporary pain reliever, numbing agent, and anti-inflammatory. 

Water will also prevent your mouth from becoming extremely dry. Braces can cause small cuts on the cheeks and gums if the mouth is too dry. Drinking water throughout the day will keep your mouth from getting sore or damaged. 

Tip #2 – Rinse Your Mouth With Warm Salt Water

Combining a half teaspoon of salt with warm water can help you naturally relieve any pain and discomfort you experience in the first few days of wearing your braces. The warm water and salt rinse work to reduce inflammation. This makes things more comfortable for you by relieving some of your pain.

Tip #3 – Don’t Eat Crunchy or Hard Foods

Pecans, almonds, and hard candy should be avoided when you have braces. Your entire mouth is going to be sore and painful the first few days after getting braces. It’s recommended that you stick to only eating soft foods that require little to no chewing.

Eating soft foods, such as mashed potatoes, smoothies, and yogurt, will reduce the pain and discomfort you experience. It’s due to the fact that you’re not moving your mouth and jaw around a lot or as much. Limiting mouth and jaw movement will give you time to adjust to wearing braces. It also allows your teeth, gums, and mouth to naturally heal and adjust to the braces so that you experience less pain and discomfort.

Tip #4 – Try Eating Cold Foods

Just like water, the coolness of certain foods like frozen yogurt, ice cream, or popsicles can help reduce any gum swelling you experience when your braces are first put on. Try to incorporate these foods into your daily diet for the first few days as it will help reduce inflammation and even relieve some of your pain.

Tip #5 – Learn How to Use the Items in Your Orthodontic Kit

Every person who wears braces will have a small orthodontic kit that contains helpful tools and items. Learning how to properly use the items can help you reduce any pain or discomfort you experience. This will not only sooth the pain in the first few days of wearing braces, but also throughout the entire course of your orthodontic treatment.

Using your Orthodontic Kit

Some of the items that can be found in an orthodontic kit that will help any discomfort include:

  • Orthodontic wax – can be used to add a layer of padding to any sharp points or edges that can be found on your wires or brackets. Orthodontic wax is also helpful if your brackets or wires break throughout the course of your treatment. The wax can be put on the broken bracket or wire so the sharp parts don’t stick or poke your gums or cheeks.
  • Lip gloss or lip balm – protects your lips from getting cracked or scratched by your braces
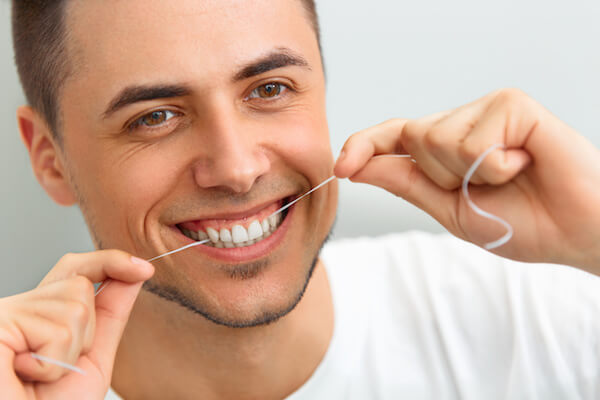
  • Dental flossfloss helps remove any food that may be stuck in your braces. Stuck food can often cause pain and discomfort, especially when you get new braces.

Valderrama Orthodontist wants to make sure that every patient has a positive experience with wearing braces. That is why we take the time to make sure that each of our patients learns valuable tips and tricks that will reduce any pain and discomfort.

Have any additional questions about how to reduce pain and discomfort associated with wearing braces? Feel free to contact our office and ask any questions you may have. Our staff will try to help you find comfort in your new braces. 


What to Do if You Lose Your Retainer

Mouth Retainer Girl

In a perfect world, you would always keep your orthodontic retainer nearby and never lose it. Unfortunately, things don’t always work that way and there is a good chance that at some point you will lose your retainer. Learn why your retainer is so important and what you need to do if you should lose it.

Why is Your Retainer an Important Part of Your Orthodontic Care?

After months and months of dealing with uncomfortable wires and stiff brackets, you have finally entered the last stage of your orthodontic treatment – wearing a retainer. This part of your orthodontic treatment may not seem like it does much, but it is one of the most important parts of your orthodontic care.

It is extremely important because it helps you keep your teeth straight and perfect. The braces with wires and brackets that you wore helped to shift and move your teeth into their new proper position. Unfortunately, your teeth will not stay in their new position and will naturally want to shift back to their “old” position. The retainer you wear helps to prevent your teeth from shifting back into their old position.

How Long Do You Have to Wear Your Retainer?

If you had orthodontic treatment,  you will always have to wear a retainer. As long as you want your teeth to stay the same way as they looked when the braces were removed. But the length of time that you will have to wear your retainer per day will vary from person to person. Some people will need to wear their retainer regularly for 12 to 15 hours per day, others would only need them for 8 to 10 hours per night.  

Everyone needs to wear retainers regularly to prevent their teeth from shifting back into their old position.

Don’t Panic if You Lose Your Retainer

It is important that you don’t panic if you lose your retainer. While it is an important part of your orthodontic care, you won’t experience problems if you are unable to wear it for few days or a week.

It usually takes a few weeks of not wearing your retainer for your teeth to shift back to their old position. So, as long as you get a replacement retainer relatively quick you won’t have to wear  braces again in order to fix your smile.

Schedule an Appointment with Your Orthodontist to Get a Replacement Retainer

A replacement retainer can be ordered through your orthodontist. Depending upon how long ago you got your retainer, you may be able to just call your orthodontist’s office and order a new retainer. However, if it has been a while since you got your retainer, you may need to come into the office and have measurements taken for a new retainer.

Retainers May Feel Tight the First Few Weeks with the New Retainer

The first few weeks of wearing your new retainer you may notice that they feel tighter and a bit uncomfortable. This is completely normal. The retainer feels uncomfortable and a bit tight because your teeth have started to shift. The retainer is gently guiding them back to their proper position.

If you don’t want to deal with any potential discomfort from your new retainer, you will want to replace your lost one as soon as possible. The longer you wait to get a replacement retainer, the more time your teeth will have to shift and you have a higher chance of experiencing slight discomfort.

Tips for Preventing the Loss of Your Retainer

There is no guaranteed way to prevent you from losing your retainer. However, there are some things you can do to lessen your chances of losing your removable retainer. Some things you can do to prevent yourself from losing your retainer include:

  • Never wrapping it in tissue as it could accidentally get thrown out
  • Keep it stored in the same place. For example, store it on a table next to your bed or in the bathroom.
  • Keep it stored in the protective case when you aren’t wearing it.
  • Try to keep to a schedule when wearing it. This helps you create a routine and lessens your chances of misplacing it.

Recently lost your retainer and in need of a new one? Call Valderrama Orthodontics to schedule an appointment to get a new retainer or to place an order for a new one.  


Why We Recommend Starting Early Orthodontic Treatment

Why We Recommend Starting Early Orthodontic Treatment

Timing is everything when it comes to orthodontic treatment for your child. Some orthodontic problems can wait for several years before being addressed – slightly crooked or gapped teeth can be fixed with tooth straightening or other cosmetic dental procedures at nearly any age. Other orthodontic problems become more difficult to address over time. In some cases, dental professionals recommend early orthodontic treatment.

Early treatment means that the orthodontist provides treatment while the patient still has some baby teeth. Orthodontists also refer to it as an interceptive treatment because it addresses problems in their earliest stages before they can pose a serious problem.

The American Association of Orthodontists (AAO) suggests every child has his or her first checkup with an orthodontist by the age of 7 years. By this age, there are permanent teeth for an orthodontist to evaluate the child’s developing teeth and jaws. This early evaluation can provide a wealth of information that can guide the child’s dental and orthodontic care for years. Of course, a child should see an orthodontist earlier than the age of 7 if an orthodontic problem develops sooner.

What to Expect at the Checkup

The initial checkup will likely have one of three outcomes:

  • No immediate treatment is necessary, and treatment will not likely be needed in the future
  • The orthodontist will recommend treatment in the future and follow the child periodically, as the child’s face and jaws continue to grow and develop
  • The orthodontist spots a problem that could benefit from early treatment

Orthodontists have the training and skills needed to spot subtle problems, even in young children. They can also perform a wide variety of procedures to address these problems early when the issues are more likely to respond positively to treatment.

Early Orthodontic Treatment Goals

Early orthodontic treatment has a number of goals. Orthodontists can guide the growth of a child’s jaw, for example, or guide permanent teeth into a more favorable position. This early treatment can improve appearance and improve the way the child’s lips meet. Early orthodontic treatment can correct harmful oral habits, and even lower the risk of trauma associated with protruding front teeth too.

While most orthodontic problems benefit from treatment after all the patient’s permanent teeth have come in, there are some issues that become more serious over time. The goals of early treatment are to detect developing problems, eliminate the root cause of an orthodontic issue, guide the growth of a child’s facial and jaw bones, and to provide enough space for the incoming permanent teeth.

Some patients who receive early orthodontic treatment require a second course of treatment later after all their permanent teeth have come in.

Orthodontic Problems that Benefit from Early Treatment

Early orthodontic treatment effectively addresses several orthodontic problems, such as:

  • Underbite – when the child’s lower front teeth sit ahead of the upper front teeth
  • Crossbite – when the patient’s jaw shifts to one side
  • Very crowded teeth, which can push each other out of place or damage teeth
  • Excessively spaced teeth that cause gaps between the teeth
  • Extra or missing teeth
  • Teeth that meet abnormally, or don’t meet at all
  • Habits, such as thumb sucking, finger sucking or use of a pacifier, which affect the teeth or jaw growth
  • Inherited orthodontic problems
  • Injuries from accidents
  • Orthodontic problems resulting from dental disease or abnormal swallowing

Early orthodontic treatment is an umbrella term that covers many procedures. Early treatment may include the use of a fixed or removable appliance that moves teeth, changes the position or the jaw or holds teeth in place to bring about desirable changes. Early orthodontic treatment may involve the removal of some baby teeth to help permanent teeth come in easier and straighter.


For more information about starting early orthodontic treatment, consult with your child’s dentist or with Dr. Natalia Valderrama, our orthodontist and dentofacial orthopedist at Valderrama orthodontics in Suntree. She has more than 20 years of dental and medical experience and can answer any questions you might have regarding with child’s growth and development. Her consultations are complimentary! Keep in mind that early orthodontic treatment can give your child something to smile about for the rest of his or her life. Remember – timing is everything when it comes to early orthodontic treatment.


All about Lingual Braces – What You Need to Know about these Invisible Metal Braces

All About Lingual Braces - What You Need to Know about these Invisible Metal Braces

If you or your child has crooked teeth and need braces, you are not alone – more than four million people in the United States have braces. About one-fourth of those wearing braces are adults. There are several types one can get: lingual braces, traditional, or even clear braces.

While braces do a good job of making your teeth look and function nicely, many people are unhappy with the way traditional braces look. Traditional braces typically have a lot of metal brackets, wires and rubber bands that sit on the outside of the teeth, where they can be seen when you smile, talk, laugh and eat.

Fortunately, Dr. Natalia Valderrama, our orthodontist at Valderrama Orthodontics offers lingual braces. These technically advanced braces are virtually invisible. This is very important for anyone who is concerned with how he or she appears, such as business people, teachers, medical professionals, and other individuals. Anyone who works in front of a camera may opt for lingual braces. People who play wind instruments or engage in certain sports, such as contact sports, may prefer lingual braces over traditional braces. While it is not surprising to see teenagers with traditional braces, teenagers can be especially sensitive about their appearance.

About Lingual Braces

Traditional metal braces go on the front of teeth, where they are easily seen. Lingual braces, by comparison, go on the back of the teeth where they cannot be seen.

Not all orthodontists offer lingual braces; only dentists who have taken specific continuing education courses have the know-how to use the equipment required to place lingual braces. Patients should seek out the care of orthodontists with the training and experience to place lingual braces correctly.

Dr. Valderrama not only has that training but she is also the only Orthodontist in Brevard County with actual existing cases and more than 10 years of experience in lingual braces.

Are Lingual Braces Right for You?

Lingual braces are not right for everyone. These braces do not work well for children or for adults with exceptionally small teeth, as short teeth do not provide enough room to glue the braces on the backside of the tooth. People with excessive bite problems, such as severe overbite, underbite and crossbite, may not be able to have lingual braces.

Some people have trouble adjusting to lingual braces because the position of the braces affects the tongue. At first, some patients may have trouble swallowing without thrusting their tongue against their teeth. The force of the tongue pushing against the teeth during swallowing can even lead to more dental issues. Fortunately, you can learn how to swallow without thrusting your tongue by touching your teeth together lightly and then your palate or the roof of your mouth before swallowing.

Other patients may have trouble speaking clearly for the first few weeks after getting lingual braces. To overcome this, try over-enunciating your words.

Caring for Your Lingual Braces

Keeping your teeth clean is important, no matter which type of teeth straightening approaches you use. Removing food particles and bacteria from the surface of teeth and braces is important in preventing tooth decay and gum disease.

Because your lingual braces are hiding behind your teeth, you may forget they are there when you brush. The placement of lingual braces can also make harder to check whether you have brushed away all the food particles. If you have trouble cleaning your lingual braces, try using a toothbrush with a narrow tip, which can make it easier to clean the back surface of your teeth.

To keep your teeth and your lingual braces in top condition, brush after every meal. Be sure to brush each tooth at its gum line, and both above and below the brackets of your sublingual braces. Also, usually while in lingual braces, more frequent appointments for cleanings with your general dentist are required. Typically every 3 months a cleaning is needed to keep lingual braces clean.


For more information about lingual braces, and to find out if lingual braces are right for you, speak with an orthodontist with the training and experience in these special braces. You might be glad to learn that you can get straighter teeth without the embarrassing appearance of metal brackets and wires of traditional braces. Call Dr. Natalia Valderrama at Valderrama Orthodontics in Suntree, Melbourne today. 321.425.5050 or visit us at www.valderramaortho.com to learn more.


How to Floss with Lingual Braces

floss with lingual braces

Flossing when you have lingual braces or any type of traditional braces for that matter, is not easy. In fact, it is time consuming, difficult, and can be painful if not done properly. Unfortunately, if you want your orthodontic treatment to work, you need to floss and you will have to floss a lot.

Want to make it easier to floss with lingual braces? The tips and tricks we have provided may make it easier to floss when undergoing orthodontic treatment.

Use the Floss Threaders Provided by Dr. Valderrama

After Dr. Natalia Valderrama puts on your lingual braces, you will be given a small kit filled with dental supplies to take home. Inside that kit is a dental product known as a floss threader. This dental supply will be used multiples a day and will make it so much easier to floss.

Dental floss threaders help guide your floss into all those hard-to-reach places you will have when you wear braces. Without the use of a dental floss threader, you would spend considerable time trying to work the dental floss around all the wires and brackets in your mouth.

Never used a dental floss threader before? The following steps explain how to use one:

Create a long line of dental floss that is approximately 18 to 20 inches long
Take one end of the dental floss and thread it through the threader. Pull the floss through the threader until you have reached the five inch mark on the floss.
Gently guide the threader with the dental floss in it around any wire or bracket.
Gently remove the threader and continue to floss as you normally would.
Remove the dental floss when complete and repeat for each hard-to-reach section
Don’t Rush Through Flossing with Lingual Braces

No matter what you do, whether you use a floss threader or you just floss regularly, do not rush through the flossing process. If you rush through flossing you could bend or break the wires or brackets or even damage your teeth. Make sure you leave enough time to floss your teeth without rushing through it.

Brushing is Just as Important as Flossing

Flossing is just one of the things you need to do to keep your teeth and gums healthy while wearing lingual braces. You will also need to frequently brush your teeth.

It is recommended that you brush your teeth after each meal and when you are done snacking. It may sound excessive, but food can easily get stuck in the wires and brackets. Brushing your teeth after every meal helps remove food particles and plaque. If left on the teeth, the food particles and plaque can cause you to develop a number of dental problems that include tooth decay and gum disease.

Brushing, just like flossing, is going to be more time consuming when you have braces. The following steps explain how to properly brush if you have lingual braces:

Hold the toothbrush at a 45-degree angle to the gum line

Move the toothbrush in straight motions that go back and forward

Move the toothbrush over every surface of the teeth – back, front, and tops

Work the tip of the toothbrush into the back of your teeth so you can remove any plaque that is stuck to the back of your teeth

Don’t brush too hard as you could damage your teeth and gums or detach your braces from your teeth.

Don’t forget to brush your tongue. When you brush your tongue, you remove harmful bacteria from the mouth. If the bacteria was left in your mouth, it could spread to the teeth and cause cavities and tooth decay.

Have questions about how to properly brush and floss when you have lingual braces? Let Valderrama Orthodontics help you. Our friendly office staff will gladly answer any questions you may have about how to properly brush and floss while wearing braces. Feel free to call our office if you have any questions. We will do our best to answer them for you. If you still have questions, we can show you how to properly brush and floss during your next scheduled appointment.


Keep Your Teeth White with Braces

Although you’re wearing braces to achieve a straight, beautiful smile, cleaning your teeth often becomes more difficult while you’re wearing them. Using whitening products while you have braces isn’t recommended by dental professionals, so what can you do to keep teeth looking clean and white? Here’s a look at some easy tips that can prevent discoloration and ensure your teeth stay looking bright while you’re going through orthodontic treatment.

Tip #1 – Be Diligent About Oral Hygiene
While you’re wearing braces, it’s important to be even more diligent about oral hygiene to keep teeth clean and white. It’s recommended to brush teeth three times a day, and flossing should be done at least once a day. Get into the routine of cleaning at least three times, and it’s a good idea to brush, or at least rinse, after every meal. A good oral hygiene routine can help prevent stains and keep your smile sparkling.

Tip #2 – Spend More Time on Each Tooth When Brushing
Since your braces can get in the way, it’s easy to miss areas of your teeth. Spend a bit more time on each tooth when brushing. Brush at various angles and between the archwires of the braces, ensuring that each part of the tooth is getting cleaned.

Tip #3 – Consider an Electric Toothbrush
Many people wearing orthodontic appliances find that an electric toothbrush makes cleaning teeth much easier. These options often are more effective at cleaning around brackets and wires. They do a better job of breathing up tartar and plaque, ensuring that you keep your teeth looking bright and beautiful. Talk to your dentist or Dr. Natalia Valderrama, our orthodontist, about the best electric toothbrush to use while you’re wearing braces. But be careful applying to much force to your teeth while using the electric toothbrush. Sometimes, the strong vibration brakes the brackets off the teeth!

Tip #4 – Floss with Super Floss
If you’re having a tough time flossing with regular floss, consider using super floss. Super floss is made up of soft spongey floss that easily cleans around appliances, regular floss for flossing between teeth, and a stiffened-end threader, which can be used to floss between your wires. Adding super floss to your dental hygiene routine can make it easier to make sure you’re eliminating food particles and plaque from all those nooks and crannies. There is also a product called Platypus, which you can buy online, that makes flossing easier and faster!

Tip #5 – Beware of Drinks and Foods that Stain Teeth
Try to avoid consuming drinks and foods that can stain your teeth, such as beets, blueberries, coffee, sports drinks, dark juices, red wine, dark sodas, blackberries, pizza and spaghetti sauce and black tea. If you do eat any of these items, be sure to rinse out your mouth thoroughly and brush teeth soon to keep them from staining teeth.

Tip #6 – Skip Sugary Foods and Beverages
Sugary foods have the ability to cause tooth decay, resulting in discolored teeth. It’s important to skip sugar foods and beverages, particularly sticky candies that can get stuck in your braces. Go for healthy fruits, veggies, whole grains, and healthy proteins instead of foods laden with sugar. Just remember, sugar isn’t only found in cakes, cookies, and candies. It’s hiding in many different foods, so check your labels. Carbohydrates can also break down into sugar on your teeth, so limit foods like white breads, white pastas, mashed potatoes, doughnuts and potato chips.

Tip #7 – Drink with a Straw
If you do drink sugary beverages or drinks that may stain your teeth, make sure you’re drinking with a straw. Using a straw keeps liquid from touching your teeth as much, reducing the chance that your drink will stain your teeth. It’s a simple way to prevent stains and keep teeth looking great while you’re wearing braces.

Tip #8 – Don’t Forget Regular Dental Visits
Along with taking care of your teeth and braces daily, one of the best tips for keeping your smile white and bright is to make sure you’re keeping up with regular dental visits. Not only can your dentist give you a professional cleaning and check for any potential problems, but a dentist can answer your cleaning questions and give you more advice on keeping your teeth white while you’re wearing braces.


Invisalign vs. Clear Braces for Your Teen

invisalign or clear braces

Teenagers often want to correct their smile but they don’t want to walk around with a mouth full of metal, rubber bands, and noticeable brackets. That is why there are the orthodontic treatment options of Invisalign and clear braces.

Invisalign and clear braces are two different types of orthodontic treatment that are designed to improve your teen’s smile by shifting and moving the teeth into their proper place. While both orthodontic options can improve your teen’s smile, one option may be better for your teen. Learn about the differences between Invisalign and clear braces.

Understanding More About Invisalign and Clear Braces  

Before you can learn about the differences between clear braces and Invisalign, you need to know more about what is involved with each orthodontic treatment option.

Invisalign uses a series of clear plastic trays to move and shift your teeth into proper position. Each of the trays is designed slightly different from each other. When you wear them, they force your teeth to slowly shift into the new position. Once the teeth are in their new position, you take out the aligner tray and replace it with the new one. This is done until your teeth reach their final position.

Clear braces, on the other hand, are very similar to traditional braces. When you get clear braces you will have the brackets, rubber bands, and archwire. However, instead of having those bright, noticeable wires and brackets everything is tooth colored. This gives the appearance that you aren’t wearing braces.

Which is More Invisible?

While both Invisalign and clear braces promise to allow you to change your smile without anyone noticing, one is more noticeable than the other. Since clear braces uses wires and brackets, people will be able to see them up close. Invisalign, on the other hand, is almost completely clear. In fact, people hardly notice you are wearing the clear plastic aligners even when they are up close to you.

Which Option Treats Moderate to Severe Orthodontic Cases?

Invisalign is great for correcting overcrowded teeth or gaps. However, it isn’t always successful at treating severe orthodontic problems. If you have severe orthodontic problems, such as extremely crooked or misaligned teeth and crossbites, you may not be a good candidate for Invisalign and will need to get clear braces.

Want Bright, White Shiny Teeth? Choose Invisalign

Staining is a huge issue with clear braces. If you smoke, like to drink dark colored beverages like tea and soda, or eat acidic or brightly colored food, you may develop noticeable stains. The stains won’t be noticeable while you have braces, but once they are moved you may notice them.

People who want bright, white teeth immediately after straightening their teeth may want to consider Invisalign. Staining doesn’t occur as often with the clear plastic trays because you are able to properly brush and floss.

Which Option is Less Painful?

Your teen will experience slight pain, pressure, and discomfort with both Invisalign and clear braces. The pain occurs because the teeth are shifting and moving to their new position which can be uncomfortable.

If your teen is looking for the least painful option of the two treatment options, they will probably want to choose Invisalign. The clear plastic aligner trays don’t cause gum irritation like clear plastic braces. The brackets and wires of can sometimes rub against your teen’s cheek and gums which can cause pain and discomfort.

Which Treatment Options has Food Restrictions?

One of the most frustrating aspects of undergoing orthodontic treatment is having to give up some of your favorite foods. That also happens with Invisalign.

When you eat, you are encouraged to remove the clear Invisalign trays. Removing the clear plastic trays is extremely easy and allows you to eat your favorite foods but you can also break the bumps in your teeth so you have to be careful also.

If you have clear braces or clear aligners,  you will still need to follow the same food restrictions that come with traditional braces. You will have to avoid popcorn, nuts, crunchy and chewy foods, and other things.

Which Option is Right for Your Teen?

It depends on their personalities, does your teen loses their phone,  the keys to their car, or house? Do they have a clean room and organized closet? Do they have good oral hygiene? Do they follow instructions well? Does your teen want to improve their smile? Call Valderrama Orthodontics to schedule an appointment for an orthodontic consultation. Our experienced orthodontist will discuss treatment options with your teen and help them determine what option is the best.


What Your Rubber Bands are Doing

what rubber bands do

Rubber bands are an essential office and school supply that helps keep you organized, but that all changes when you undergo orthodontic treatment. Getting braces will change the way you look at rubber bands. Never again will rubber bands be thought of as only a school or office supply, they will be thought of as a valuable tool that helps you get that straight, perfect smile.

Orthodontic Rubber Bands are Different That Office Rubber Bands

While both have the same name and they look similar, they are actually two different things. In fact, you can’t take a rubber band from your desk and use it for your braces. That is not only unsanitary, but it probably isn’t the proper size.

Even though they are two different things, the use of the same name will change how you think of rubber bands. After your braces are removed, you will always think of orthodontic rubber bands every time you hear the word.

Learn about the Different Types of Orthodontic Rubber Bands

There are two types of orthodontic rubber bands: ligature and interarch rubber bands. Each of these rubber bands plays an essential role in helping you improve your smile.

A Closer Look at Ligature Rubber Bands

Every person who gets braces will have ligature rubber bands. Ligature rubber bands are the tiny, colorful rubber bands that are wrapped around the brackets on each tooth. Ligature rubber bands come in a wide variety of colors ranging from neon and traditional colors to clear, tooth-color.

These tiny rubber bands are needed as they help keep your braces on your teeth. Each of these rubber bands is securely wrapped around the bracket, which is bonded or stuck to the tooth. Once it is wrapped around the bracket, the ligature will then hold the archwire in place. The archwire is what helps move or shift your teeth so they will eventually end up in their proper position. If it is not held in place, your teeth will not move the way your orthodontist wants them to and you will not get the smile you want.

Due to their size, delicate nature, and the complex process involved with putting them on, ligatures can only be removed or replaced by an orthodontist. Every appointment you have with your orthodontist to adjust your braces, your ligatures will be removed and new ones placed around your brackets.

A Closer Look at Interarch Rubber Bands

Interarch rubber bands are those large, visible rubber bands that are found on the sides of your mouth when you are wearing braces. These rubber bands loop around one of the brackets on your upper teeth and connect with brackets on the bottom of your teeth. These rubber bands help to re-adjust your jaw alignment by subtly shifting your jaw forward or backwards.

Not every person who undergoes orthodontic treatment will need interarch rubber bands. Your orthodontist will determine if interarch rubber bands are needed. If it is determined you need interarch rubber bands, you may not need to wear them all the time. You may only need to wear them for a certain amount of time during your orthodontic treatment. Your orthodontist will provide you with instructions on how to place the rubber bands in your mouth, how long you will wear them, and how often you need to change them out.

Unlike ligatures, interarch rubber bands can be changed out without the need for an orthodontist. In fact, if you have interarch rubber bands you will be replacing them a lot as they need to be removed when you eat and when you brush and floss.

Learn How to Properly Wear Your Interarch Rubber Bands

It is important that you learn how to properly place your interarch rubber bands on your braces. If you don’t put them on the right way you can cause delays to your orthodontic treatment or it could even cause the alignment of your jaw or bite to get worse.

Valderrama Orthodontics will make sure you know how to properly place your interarch rubber bands before your appointment is over. We will have you practice removing the old rubber bands and putting in new one so you know what you have to do. After the appointment, if you have any questions or run into problems, feel free to call our office. Our office staff will gladly help you.


Avoid These Foods During Thanksgiving

foods during thanksgiving

Thanksgiving is always a difficult time for people who are wearing braces because so much of the holiday’s celebration centers on food. Usually, being around all that food isn’t bad when you can eat whatever you want, but when you have braces there are a number of foods you can’t eat. Luckily for every food you can’t eat during Thanksgiving, there are a number of other tasty foods that you can eat.

Avoid damaging your braces this Thanksgiving by learning about which foods you should avoid and which ones are safe to eat.

Avoid: Nuts (Pecans, Almonds, Cashews, etc.)

Nuts are usually on the top of the ‘do not eat’ food list when you get braces. So, it should be second nature to avoid eating nuts out of a jar or a bag. Unfortunately, what people don’t realize is many side dishes and desserts include nuts as an ingredient.

Before trying a new side dish or dessert make sure to verify if it contains nuts. The last thing you want to do is start eating only to hit a random hard nut that ends up breaking a bracket off or twisting your wires.

Approved: Ham, Turkey, Roast Beef, or Fish

Any type of main meat option is safe to eat when you have braces. These foods rarely contain hard or sharp pieces that could damage your braces. That means you are able to enjoy the traditional meal of turkey with gravy if you want!

If you do choose roast beef make sure it isn’t too tough to eat. Sometimes tough meat requires a lot of chewing which puts you at risk of damaging the brackets of your braces.

Another thing to consider is the bones in fish. The bones are usually removed, but sometimes one or two are left in the fish. When eating fish make sure you are aware that bones could be present and take precautions so your braces are not damaged.

Avoid: Sticky Desserts

Desserts that contain toffee, caramel or other sweet ingredients may be tempting, but there is a good chance they could damage your braces. The sticky foods tend to latch onto the wires and brackets of your braces. When this happens it can pull the brackets away from your teeth or cause the wire to poke your cheeks.

There are plenty of braces-friendly desserts that you can enjoy. Don’t risk damaging your braces just to enjoy one of this sticky and sweet treats.

Approved: Potatoes (Mashed, Baked, Scalloped, and Sweet Potatoes)

Potatoes are safe to eat because they are so soft. Just be careful with anything that you might add to the potatoes such as toppings like crunchy bacon or any ingredients that might be baked into the dishes. You don’t want to run into a random crunchy piece that suddenly breaks your braces.

Other Foods to Avoid

Some other foods to avoid during Thanksgiving include:

  • Popcorn – any type from traditional popcorn to caramel corn and kettle corn
  • Chips
  • Crunchy apples
  • Corn on the cob
  • Anything that appears overly crunchy, sticky, or hard

Other Examples of Safe Foods to Eat with Braces

Some examples of foods that are safe to eat with braces include:

  • Corn – any type of corn just not one that is on the cob
  • Casseroles – be careful of mixed in ingredients as they can sometimes be crunchy or hard
  • Dressings
  • Cooked green beans, cooked broccoli
  • Biscuits

Remember to Keep Your Braces and Teeth Clean This Thanksgiving

Don’t get caught up in all the excitement of the holidays and forget to brush, floss, and care for your teeth and braces. Make sure you are doing the following things:

  • Brushing your teeth about 20 minutes after every meal
  • Flossing after every meal and if you can’t floss after every meal at least floss once a day
  • Make sure you properly clean all around your teeth and braces. Don’t quickly brush your teeth. Make sure you do a good job as you want to remove all food particles and plaque.
  • Rinse your mouth with water if you are unable to quickly brush your teeth. This will help neutralize any sugars and acids in your mouth until you get time to properly brush.

Do you have a particular food or side dish that you want to eat this Thanksgiving but are unsure if it is okay to eat with braces? If so, let Valderrama Orthodontics help. Call our office and our staff will gladly help you determine if the foods you wish to enjoy will not break your braces.


Preparing for Braces

preparing for braces

It may seem like people who get braces just casually stroll into an orthodontist’s office for an appointment and walk out with a mouth full of small brackets and tiny wires, but looks can be deceiving. There is actually a lot of prep work that is involved in the days, weeks, and even months before a person gets braces.

Discover what type of prep work goes into helping a person physically and mentally prepare to get braces.

Complete All Recommended Dental Work

Sometimes before braces can be put on you will need to schedule an appointment with a general dentist to correct certain problems. Some dental problems such as cavities, gingivitis, and gum disease typically need to be treated before braces can be placed.

In some situations, you may even need to schedule an appointment with a dentist, orthodontist, or oral surgeon to have teeth removed. Removing teeth may be needed to give your mouth enough room to properly fit all your teeth.

Dr. Natalia Valderrama, our orthodontist,  will go over any recommended dental work that needs to be done during your consultation. Once the recommended dental work is completed you can move on to the next step of your orthodontic journey.

Enjoy Snacking on Favorite Treats that Can’t be Eaten When Wearing Braces

One of the most frustrating things about wearing braces is there will be a lot of foods and snacks that you won’t be able to eat. It is often recommended that approximately two weeks before your scheduled appointment for braces that you go out and enjoy snacking on all your favorite treats that you will be unable to enjoy later.

Some of the foods that you won’t be able to eat when you are wearing braces include:

  • Popcorn
  • Extremely chewy snacks such as toffee and caramel
  • Nuts
  • Hard candy
  • Crunchy raw vegetables and fruits such as carrots, celery, and apples
  • Hard snacks such as crackers
  • Ice chips
  • Crunchy chips

Once you have had your fill of your favorite foods and snacks, you should probably remove them from your home. They can be extremely tempting. If you give into the temptation and eat them while wearing braces you could damage the brackets and wires.

Create an Orthodontic Kit

We will give our patients a small kit to take home with them filled with all the tools and dental equipment that will be needed to do everything from cleaning your teeth and gums to temporarily fixing any problems that arise with your braces. While these kits are great for short-term use, they don’t have enough items to prepare you for your entire orthodontic journey.

Make sure you are prepared by creating an orthodontic kit before you get braces. Preparing the kit ahead of time will prevent you having to run to the store to purchase a tool or item you need to fix your braces or relieve any discomfort you feel from your braces.

Things to include in your orthodontic kit include:

  • Waxed dental floss
  • Small dental brushes
  • Threaders
  • Toothbrush
  • Toothpaste
  • Orthodontic wax
  • Over-the-counter pain medication – make sure to speak with your doctor or orthodontist before taking any types of medications
  • A card with Dr. Valderrama office’s phone number on it to call in case of an emergency or if you have any questions

Prepare Mentally for Getting Braces by Learning What to Expect

Taking the time to learn about what to expect at your first orthodontic appointment as well as what will happen during the course of your orthodontic treatment can help you mentally prepare.

While every orthodontic patient’s experience will vary, the following are some examples of what to expect during orthodontic treatment:

  • The first appointment typically takes about an hour to two hours
  • The first appointment includes preparing the teeth, gluing the brackets onto the teeth, and placing the wire
  • No pain is involved with getting braces, but you will feel slight pressure
  • Feeling uncomfortable for a few days after getting braces is extremely common
  • Orthodontic appointments will be scheduled every four to six weeks. These appointments will allow your orthodontist to monitor your progress and make adjustments
  • Follow up appointments typically last anywhere from a half hour to an hour

Have questions about how to prepare for braces? Call Valderrama Orthodontics @ 321.425.5050. Our friendly office staff and orthodontist Dr. Natalia Valderrama will do our best to help you prepare for getting braces by answering any of your questions.